SSH server

The sixth assignment for the Tero Karvinen’s Linux Basic course was to install the SSH server and create a test user. I have a Sony Vaio VPC-EH2F1E. The operatin system I use is Windows 7 Home Premium 64-bit with service pack 1.  The processor is a Intel Core i3-2330M 2,20GHz. Installed RAM 4 GB.

Firstly I ran 12.04.3 version xUbuntu  32 bit from my Live-CD and connected my computer with my home WiFi.

Step1 Installing SSH server

Menu -> Accessories -> Terminal emulator

  • First thing is always update the packages with the command $ sudo apt-get update
  • Next is to install the SSH server with the command $ sudo apt-get install openssh-server (when you don’t know the exact name you can use the search command$ apt-cache search . e.g. $ apt-cache search ssh server ).
  • Testing the SSH server:
  • For checking who is the user is the command  $ whoami is used
  • For changing the password the command $ passwd is used. It is important to use a strong password with different characters and numbers. From this page ypu can find some tips about strong passwords:  https://billing.serverorigin.com/knowledgebase.php?action=displayarticle&id=40.

passwd1

  • Then you can test your server with the command $ ssh xubuntu@localhost, The password is asked. When you want to quit your connection use the command $ exit.

xubuntulocalhostexit

Step 2 Adding the test user

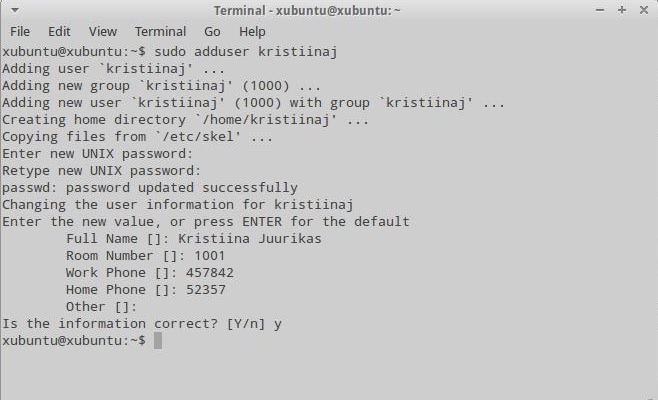
  • For adding a user you need to use the command $ sudo adduser [username] (I added $ sudo adduser kristiinaj)
  • Then you need to give a password for the user. Remember that it should be a strong password.
  • Then you can add information about your user.

adduser

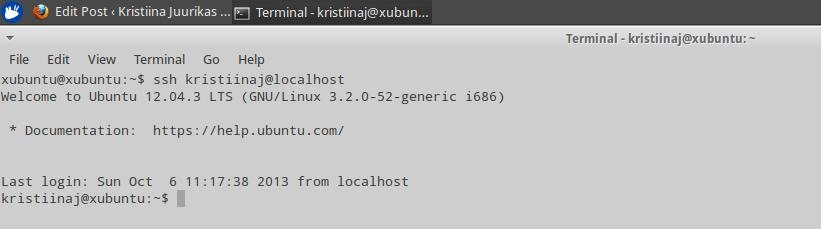
The user kristiinaj is added. I tested it with the following command:  $ ssh kristiinaj@localhost. If you want to quit the connection use the command $ exit.

kristiinajlocalhost

When you want to automate the login with the  your user, You should:

  • run the ssh-keygen
  • run the command  to copy the keys in your  target server $ ssh-copy-id [username]@localhost. (In my case $ ssh-copy-id kristiinaj@localhost.) It will ask the users password

login1

  • Then when you login with your user using the command: $ ssh [username]@localhost. (In my case: $ ssh kristiinaj@localhost.) This time the password is not anymore asked. When you want to quit the connection use the command  $ exit

login2

Used sources:

https://billing.serverorigin.com/knowledgebase.php?action=displayarticle&id=40. Accessed: 6.10.2013

http://serverfault.com/questions/241588/how-to-automate-ssh-login-with-password. Accessed: 6.10.2013

Installing Apache2

The fifth assignment for the Tero Karvinen’s Linux Basic course was to install Apache 2 and additionally to analyze the log files. I have a Sony Vaio VPC-EH2F1E. The operatin system I use is Windows 7 Home Premium 64-bit with service pack 1.  The processor is a Intel Core i3-2330M 2,20GHz.

Firstly I ran 12.04.3 version xUbuntu  from my Live-CD and connected my computer with my home WiFi.

Step 1 Installing Apache2

The very first thing to do is always to update the package list with the command $ sudo apt-get update.

For testing, I opened my browser and  typed local host in the address bar. I got this kind of page:

1

After that I installed apache2 and I used the command line $ sudo apt-get install apache2. (I knew what I needed to install, but when you don’t know the exact name you can use the search command: $ apt-cache search . e.g. $ apt-cache search web server ).

After the installation was completed I checked if it worked by going to the web browser and typed local host in the address bar. The page appeared  that it worked!

2

Step 2 Creating a homepage for the user

Firstly I found out the user that I will create the page for. I used the command $ whoami. The user is: xubuntu. Then I tested it in the web browser by typing localhost/~xubuntu, this page appeared:

notfound

To get more information about this error you can browse the logs by inserting the command:  tail /var/log/apache2/error.log

3

To get a working webpage we need to modify the system settings, it is done order to get the permission to create the directory. 2 steps is needed for that. 1) command line : $ sudo a2enmod userdir and 2) for restarting the service we need to use the command:  $ sudo service apache2 restart.

4

5

Now is possible to make the directory for the user. For this the command $ mkdir public_html is used. After that the homepage was created for the user and now is possible to publish pages.

public

I created fast a page for the user by creating a simple text file under the public_html directory. This is done by used with the command  $ nano page.html. 

The content I added:

8

And the page in the web browser:

9

The page.html page:

10

Step 3 analyzing the log files

Access logs:

This tracks the accesses to your Website, the browsers being used to access the site and referring urls that your site visitors have arrived from.

11

Analyzing the last line:

First is the IP address of the client  which made the request to the server. Second is the time stamp- the time that the request was received. Third is the the request line from the client: GET method, source the client requested and the protocol what is used (HTTP/1.1). 200 452 – first part means the status code that the server sends back to the client and the second part indicates the size of the object returned to the client. Next line gives the site that the client reports having been referred from. The last line is the user-agent. This is the identifying information that the client browser reports about itself.

Error logs:

The error log contains messages sent from Apache for errors encountered during the course of operation.

12

Analyzing the last line:

First the time stamp- log entry date and time. The second item is that an error is occurred. Third item is the IP address of the client. Last item is the error message, what happened -that I tried to access public_hmtl, but it doesn’t exist.

Sources:  http://www.apacheviewer.com/logfiles.php 25.09.2013

http://httpd.apache.org/docs/2.2/logs.html 30.09.2013

Edited: 30.09.2013

Installing software using the command line

The fourth assignment for the Tero Karvinen’s Linux Basic course was to install 3 pieces of software using the command line. Also analyze 3 lines of logs. The computer I am using is Sony Vaio VPC-EH2F1E. The operating system I use is Windows 7 Home Premium 64-bit with service pack 1.  The processor is a Intel Core i3-2330M 2,20GHz.

Installing the software

Firstly I ran 12.04.3 version xUbuntu  from my Live-CD. Opened the Terminal Emulator. (Menu -> Accessories -> Terminal Emulator).

Step 1: Updating the list of available packages

I used the command: $ sudo apt-get update. This command is used to re synchronize the package index files from their sources via Internet.

Refereed from: http://www.cyberciti.biz/faq/how-do-i-update-ubuntu-linux-softwares/ 22.09.2013

Step 2: Searching for the needed software

We needed to install 3 software with a purpose. I decided to install software’s: for instant messaging, a photo management program and CD/DVD burner software.  The command I used was $ apt-cache search.

The search commands I used for my 3 programs:

  • $ apt-cache search instant messaging
  • $ apt-cache search manage photo ( I tried photo management but it didn’t show any results)
  • $ apt-cache search DVD burner

Then there was a long list of different software’s available. To read more about some program I used the command:  $ apt-cache show [name of the software].

I choose to look up the description for these software:

  • $ apt-cache show emesene
  • $ apt-cache show flphoto
  • $ apt-cache show xfburn

Example of the show command:

Terminal - xubuntu@xubuntu- ~_001

Step 3: Installing the software

To install the software, you need to use the command  $ sudo apt-get install [name of the software]. The software is now installed. Note! To not interrupt the installation !

I choose to install: emesene, flphoto and xfburn

Example of installation

Terminal - xubuntu@xubuntu- ~_004

Step 4: Run the installed software

After I installed my three programs. I tried to find them from the system. To run the program in the background I used the command $ [program  name] &, for example :  emesene &

Step 5: Inspect the log 

We needed to  analyze 1-3 lines of log of your choosing. To inspect the activities you can use the command: $ ls  /var/log , it lists all the directories in that. Next I used $ grep sudo /var/log/auth.log it contains system authorization information, including user logins and authentication machinsm that were used.

Terminal - xubuntu@xubuntu- ~_007

Terminal - xubuntu@xubuntu- ~_010

Sep 22 18:01:39 xubuntu sudo: xubuntu : TTY=pts/3 ; PWD=/home/xubuntu ; USER=root ; COMMAND=/usr/bin/apt-get update

This line shows that the root user inserted the command apt-get update at 18:01:39

Sep 22 18:11:10 xubuntu sudo: xubuntu : TTY=pts/1 ; PWD=/home/xubuntu : USER=root ; COMMAND/usr/bin/apt-get install emesene

This line shows that the root user used the command apt-get install emesene at 18:11:10 to install a software

Sep 22 18:21:02 xubuntu sudo: xubuntu : TTY=pts/1 ; PWD=/home/xubuntu ; USER=root ; COMMAND=/usr/bin/tail -f auth.log

This line shows that the root user used the command tail-f auth.log (what is used If you want to view the content of the log files real time, as the application is writing to it. Also it is possible to view multiple log files at the same time.

TTY (TeleTYpewriter ) ports are direct connections to the computer such as a keyboard/mouse or a serial connection to the device. PTS (Pseudo Terminal Slave) connections are SSH connections or telnet connections. All of these connections can connect to a shell which will allow you to issue commands to the computer.


Used sources:

http://www.thegeekstuff.com/2011/08/linux-var-log-files/ Accessed: 22.09.2013

http://www.nixtutor.com/linux/getting-familiar-with-linux-logs/ Accessed: 22.09.2013

http://www.question-defense.com/2009/09/11/what-do-pts-and-tty-mean-on-linux-what-is-the-difference-between-the-two-terminal-types Accessed: 23.09.2013

Edited: 23.09.2013

Command line commands in Linux

The third assignment for the Tero Karvinen’s Linux Basic course was to try out 3 new command line commands. The computer I am using is Sony Vaio VPC-EH2F1E. The operating system I use is Windows 7 Home Premium 64-bit with service pack 1.  The processor is a Intel Core i3-2330M 2,20GHz.

Firstly I went through the Command Line Basics what were provided us in the class. The point was to try out some new commands that are not listed on the page, so I typed to Google: useful command line commands ubuntu.  I found some good pages what contain a decent amount of useful CLI Commands.  I recommend to check these out and I also took my three commands from these pages:

Firstly I ran 12.04.3 version xUbuntu  from my Live-CD.

I decided to try these commands and a additional one:

Opened in the left corner the menu -> Accessories -> Terminal emulator

1. ifconfig

It gives you a possibility to configure a device, but it is mostly used to get feedback about your networking device -especially for troubleshooting ethernet. It gives you a list of your IP and MAC address.

snapshot1

Refereed from: http://linuxaria.com/article/7-useful-commands-ubuntu-linux-newbies?lang=en

2. xkill

A handy command when a GUI program doesn’t response  and won’t close. You have to run the command and click on the window you want to close, it “kills” the window and its parent process.

snapshot2

Refereed from: http://apcmag.com/how-to-control-ubuntu-from-the-command-line.htm

3. df -h

Displays all free space across all the disk in human-readable format.

snapshot3

Refereed from: http://apcmag.com/how-to-control-ubuntu-from-the-command-line.htm

And the additional command for shutting down the machine shutdown -h now. Note that  Sudo or root access assumed!

Installing 3 applications using package manager in Linux

The second assignment for the Tero Karvinen’s Linux Basic course was to download application using packing manager and complete real tasks with the programs. Also to find free alternative applications for the programs I use on my Windows operating system.

Installing three applications using package manager

I have a Sony Vaio VPC-EH2F1E. The operatin system I use is Windows 7 Home Premium 64-bit with service pack 1.  The processor is a Intel Core i3-2330M 2,20GHz.

Firstly I ran 12.04.3 version xUbuntu  from my Live-CD and connected my computer with my home WiFi. Then I went to the menu and opened Ubuntu Software Center. The three programs I chose to download were such that I will use all the time : VLC Media Player, Pinta Image Editor and KolourPaint. (Additionally I also downloaded Blender, because I have taken a Blender course offered by Haaga-Helia).

For downloading VLC Media Player I chose from the Ubuntu Software Center -> media -> clicked VLC Media Player -> Install  (I sorted the applications by TopRated.)

I tried to play different media types with it for example movies and music. It is a very good player. According to  http://www.videolan.org/vlc/ the main features of VLC are that it plays everything , plays most codecs with no codec packs needed. Can do media conversion and streaming and runs on all platforms.

For downloading Pinta Image Editor I chose Ubuntu Software Center -> Paint & Editing -> Pinta Image Editor -> Install  (I sorted the applications by TopRated.)

This is a alternative for the Photoshop I usu to edit my photos.  In Linux there is already Gimp, but I also wanted to try other editors that Linux provides freely. Pinta is lighter and simpler than popular open-source image editor and has less features than GIMP. But I can say I personally prefer GIMP, because it has more features. But when you need to edit only basic things is Pinta also a good option. Here is a photo that I edited using Pinta Image Editor:

Before:

554141_10151303101049575_363433426_n

After:

valmis

For downloading KolourPaint I chose Ubuntu Software Center -> Paint & Editing -> KolourPaint -> Install  (I sorted the applications by TopRated.)

It is a alternate for the Paint offered by the windows operating system. I tried to paint with it and It was really easy to use and it has almost the same layout and features like Paint, but KolourPaint also offers a  transparency feature what Paint doesn’t have.  Here is a little picture I drawer using the program:

uss

Free alternative applications for the programs I use on my Windows operating system

Here are some programs I usually use on my Windows OS and i tried to find some free alternatives of them:

1. Windows Office 2010 (Word, Excel, PowerPoint)

It is the most used program for processing any data . I do all my homework with using Office software.

Free alternative: LibreOffice

2. Photoshop CS5

It is a graphic editing software. I use it to edit and manipulate my photographs.

Free alternative: GIMP

3. Microsoft Visual Studio 2010

It is a development environment for developing different applications.

Free alternative: ?

4. WinZip

Shareware file archive and compressor.

Free alternative: PeaZip

5. Windows Media Player

Program for playing video and audio and viewing pictures.

Free alternative: VLC Media Player

6. Adobe Acrobat

For designing, manipulating and reading files in PDF format.

Free alternative: Document Reader

Updated: 10.9.2013

Creating a xUbuntu Linux Live-CD

This semester I started Tero Karvinen’s course Linux Basic. The first assignment for this course was to make a Linux live-CD and try it on my home computer.

Downloading xUbuntu

For downloading I visited the xUbuntu page. (http://xubuntu.org/getxubuntu/). There were available two releases of xUbuntu 13.04, Raring Ringtail and 12.04, Precise Pangoline. I decided to download the older release (mainly also because I only had CD’s at home). Then there were two different downloads available: Torrent download and the image file download. I downloaded the image file from an mirror. (Europe -> and chose xbuntu-12.04.3-desktop-i386.iso).

Burning xUbuntu Live-CD

I have a Sony Vaio VPC-EH2F1E. The operatin system I use is Windows 7 Home Premium 64-bit with service pack 1.  The processor is a Intel Core i3-2330M 2,20GHz.

For burning the CD I right-clicked on the file and chose Open with -> Windows Disc Image Burner.  Also I chose the option to verify the disk after burning. The burning completed successfully and the disk ejected. My Live-CD was ready!

Testing the Live-CD

The test was conducted on 2.9.2013. I inserted the Linux Live-CD and restarted my computer. It started to boot from the CD. It took a while to read it but then the screen appeared with two options: to Try xUbuntu  and Install xUbuntu.  I clicked to Try xUbuntu and it started to run.

At first I checked if the mouse and keyboard are working. They worked properly. Then I tried to use the web browser, but at first I needed to connect to my home wireless network. When inserting the password I noticed that my keyboard layout was English and I needed Finnish one.  I went to the menu and chose accessories -> terminal emulator and typed setxkbmap fi. After that I could successfully connect to my network. In web browser I checked that it displays the pages correctly. After that I also browsed a little bit in the menu (played sudoku, cheked gimp etc..). The testing  was successful!

Edited: 5.9.2013